
Why That Simple Lint Screen Matters More Than You Think
Cleaning the lint filter on a dryer is one of those household tasks that seems almost too simple to matter. But here’s what you need to know right away:
Quick Answer: How to Clean Your Dryer Lint Filter
- After every load: Pull out the lint screen and remove lint by hand
- Every 6 months: Deep clean with hot water, mild detergent, and a soft brush to remove waxy buildup
- As needed: Vacuum the lint trap housing to remove hidden debris
If you’re like most Portland homeowners, you probably clean your dryer’s lint screen after every load—or at least you try to remember. You pull it out, roll off that satisfying clump of fuzz, toss it in the trash, and slide the screen back in. Done, right?
Not quite.
Here’s what the research shows: cleaning your lint trap removes only about 25% of the lint that builds up throughout your dryer vent system. Even worse, fabric softener sheets and liquid softeners leave an invisible film on that screen—a waxy residue that blocks airflow even when the screen looks clean.
According to the National Fire Protection Association, dryers are one of the leading causes of home fires, and excess lint is often the culprit. That little screen isn’t just about keeping your clothes dry faster. It’s about protecting your family, your home, and your wallet from preventable damage.
The good news? A proper cleaning routine takes just minutes and can dramatically reduce fire risk, cut energy bills, and extend your dryer’s lifespan.

Why Cleaning Your Dryer’s Lint Filter is a Non-Negotiable Task
The humble dryer is a workhorse in our Portland homes, but without proper maintenance, it can become a threat to your safety and budget. Cleaning the lint filter on a dryer is a critical safety measure and a smart economic decision.
First, lint buildup is a major fire risk. The National Fire Protection Association (NFPA) reports that failure to clean is a leading cause of dryer fires. Between 2010 and 2014, US fire departments responded to over 15,000 home fires involving clothes dryers, with 27% caused by dust, fiber, or lint. Lint is highly flammable, and when it accumulates in the vent, it restricts airflow and causes heat to build up. This hot, dry lint can easily ignite, creating a dangerous fire hazard. The U.S. Consumer Product Safety Commission also noted that electric dryers are more than twice as likely as gas dryers to be the cause of these fires.
Beyond fire danger, a clogged filter impacts your dryer’s efficiency. A blocked lint trap forces your dryer to work harder and longer, increasing energy consumption and your bills. If your clothes take longer to dry, require multiple cycles, or feel unusually hot, your dryer is likely struggling with restricted airflow.
This increased workload also causes premature wear and tear. A struggling dryer has a shorter lifespan, leading to costly repairs or early replacement. For gas dryers, a blocked vent poses an additional risk: carbon monoxide buildup. A clogged vent can prevent the proper exhaust of this toxic gas, allowing it to back up into your home.
Cleaning the lint filter on a dryer is not just about tidiness. It’s about fire prevention, energy savings, extending your dryer’s life, and safeguarding your family’s health. It’s a small task with monumental benefits.
How Often and Where to Find Your Lint Filter
Knowing how often to clean your lint filter and where to find it on your specific dryer model are the first practical steps toward a safer and more efficient laundry routine. We often hear from homeowners in areas like Beaverton and Milwaukie who are surprised by how much lint can accumulate, even after just one load.
The golden rule for routine maintenance is simple: clean your dryer’s lint filter after every single load of laundry. This isn’t an exaggeration; it’s a best practice recommended by appliance manufacturers like Whirlpool, Maytag, and LG. By doing this, you remove the bulk of the fibers that could otherwise build up, ensuring optimal airflow for the next cycle. It’s a quick habit that takes mere seconds but makes a world of difference in preventing fires and keeping your dryer running smoothly.
However, simply removing the visible lint isn’t always enough. As we mentioned, dryer sheets and liquid fabric softeners can leave a waxy, invisible film on the mesh screen over time. This residue can significantly impede airflow, even if the filter looks lint-free. That’s why we recommend a deeper clean for your lint filter approximately every 6 months (or every 6 to 8 weeks if you use fabric softeners frequently). This deep cleaning process will remove that stubborn buildup, restoring your filter to its full filtering capacity. Think of it as a reset button for your filter.
When it comes to locating your lint filter, most dryers follow one of a few common designs. While the exact placement might vary slightly by model and brand, you’ll typically find it in one of these spots:

- Top-Mounted: For many older models and some newer ones, the lint filter is a flat, rectangular screen that slides into a slot on the top of your dryer, typically in front of the control panel. You simply pull it straight up to remove it.
- Inside the Door: This is a very common placement for modern front-load dryers and some top-load models. The lint filter is integrated into the dryer door opening, often a curved or rectangular screen that pulls straight out towards you once the door is open.
- On the Back Wall (less common, usually for condenser dryers): While less frequent for traditional vented dryers, some condenser or heat pump dryers (often found in smaller apartments or specialized laundry setups) might have their filters located in a compartment on the lower front or even on the back wall of the drum.
If you’re unsure about your specific dryer model, especially if you have a less common setup or a combo washer/dryer unit, the best resource is always your user manual. It will provide precise instructions and diagrams for your appliance. Taking a moment to familiarize yourself with your dryer’s specific design will ensure you’re cleaning the lint filter on a dryer correctly and effectively.
The Simple Guide to Cleaning the Lint Filter on a Dryer
Now that we understand the critical “why” and “where” of lint filter maintenance, let’s get down to the “how.” Incorporating routine lint filter cleaning into your laundry day is one of the easiest and most impactful habits you can adopt for home safety and appliance longevity. It takes mere seconds, and the benefits are immense. This basic step is about ensuring consistent, optimal dryer performance with every single load.
Basic steps for cleaning the lint filter on a dryer
Here’s how to make cleaning the lint filter on a dryer a seamless part of your laundry routine:
- Remove the Screen: Once your dryer cycle is complete and the clothes are out, gently pull the lint filter screen from its slot. Depending on your dryer model, it will either slide straight up (if top-mounted) or pull straight out towards you (if inside the door).
- Roll Lint Off with Fingers: Using your fingers, gently roll or peel the accumulated lint off the mesh screen. You’ll often find it comes off in a satisfying, compact sheet. Resist the urge to use water at this stage, as wet lint can be harder to remove and might push fibers deeper into the mesh.
- Dispose of Lint: Place the removed lint in a trash can. Some people even collect dryer lint for composting (check local guidelines) or as a fire starter for camping, though we primarily recommend proper disposal to prevent any accidental fires.
- Re-insert Screen: Once the screen is clear of visible lint, slide it back into its designated slot until it’s fully and securely in place. You should hear or feel it click or settle firmly.
That’s it! This simple process should be performed before or after each and every drying cycle. Making this a consistent habit ensures that your dryer maintains good airflow, dries clothes efficiently, and minimizes the risk of lint-related issues. It’s a small effort that yields significant peace of mind for homeowners across Portland and the surrounding areas.
Beyond the Basics: How to Deep Clean a Clogged Lint Screen
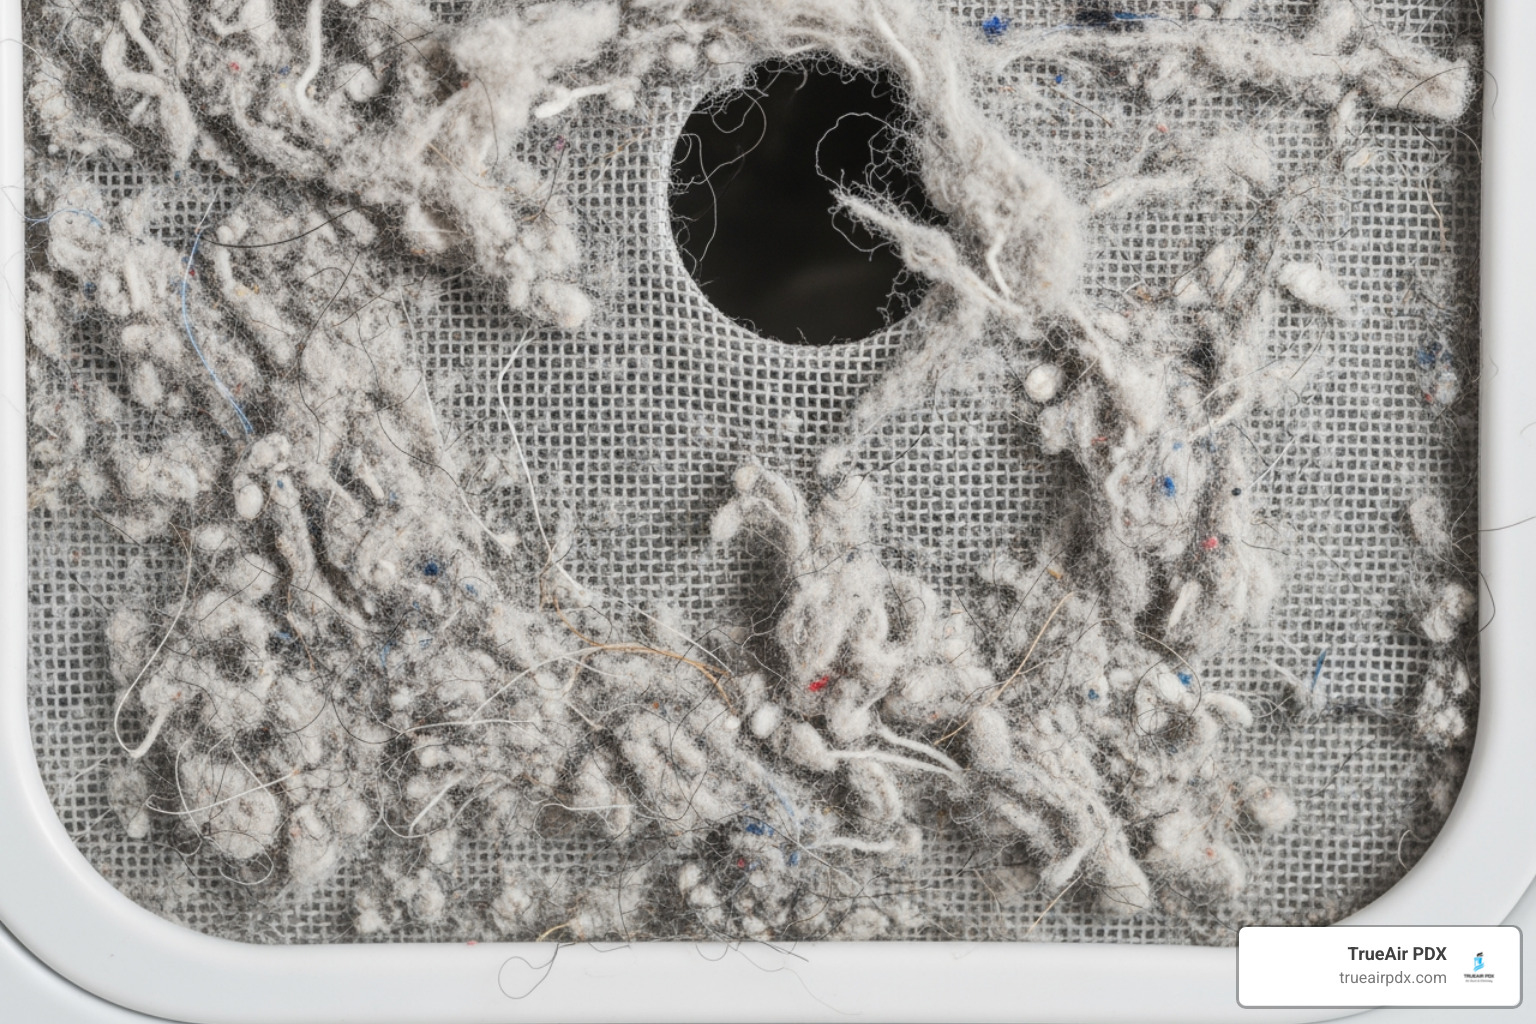
Even with diligent routine cleaning, your dryer’s lint screen can develop a sneaky problem: waxy buildup. This often invisible film, primarily from dryer sheets and fabric softeners, can significantly reduce airflow, making your dryer work harder and increasing drying times. It’s a common issue we encounter when helping clients in places like Gresham and Tigard with their dryer vent needs.
How do you know if your lint screen has this waxy residue? Try the “water test.” Run water from your tap onto the screen. If the water beads up and pools on the mesh instead of flowing through, you’ve got buildup. This indicates that even if the screen appears clean, its tiny pores are clogged, preventing proper airflow. When water can’t pass through easily, neither can air, which means your dryer isn’t operating as efficiently or safely as it should.
This deep cleaning isn’t just about efficiency; it’s about prolonging the life of your dryer and preventing potential hazards. While you remove the loose lint after every load, this deeper clean targets the stubborn, sticky film that routine cleaning can’t touch. We recommend performing this deep clean approximately every six months, or even more frequently (every 6 to 8 weeks) if you’re a heavy user of fabric softeners or dryer sheets.
Deep cleaning the lint filter on a dryer to remove residue
Here’s how to banish that waxy buildup and restore your lint screen to its pristine condition:
- Supplies Needed: Gather your tools:
- Hot water
- Mild detergent (dish soap works perfectly, or a product like Simple Green All-Purpose Cleaner can also be effective. You can find Simple Green at many local retailers, including Lowe’s, Walmart, Amazon, Sam’s Club, Ace Hardware, and Menards.)
- A soft nylon brush (an old toothbrush or a dedicated scrub brush works well)
- A sink or large basin

- Remove Loose Lint: First, remove any visible, loose lint from the screen by hand, just as you would for routine cleaning.
- Submerge and Soak Screen: Fill your sink or basin with hot water and add a few drops of mild detergent. Submerge the lint screen completely in the soapy water. Let it soak for about 10 minutes to help loosen the waxy film.
- Gently Scrub Both Sides: After soaking, use your soft nylon brush to gently scrub both sides of the mesh screen. Pay attention to any areas where water might still be pooling, indicating stubborn residue. The goal is to carefully dislodge the film without damaging the delicate mesh.
- Rinse Thoroughly: Rinse the screen completely under clean, running hot water. Make sure all soap residue is gone. Perform the water test again – water should now flow freely through the mesh, not pool on top.
- Air Dry Completely Before Reinserting: This step is crucial. Lay the lint screen flat on a clean towel or hang it to air dry completely. Do not reinsert a damp lint screen into your dryer, as moisture can lead to odors or even block the micro-holes you just cleaned. It might take a few hours, so plan this cleaning for a time when you won’t need your dryer immediately.
By following these steps, you’ll ensure that your dryer’s lint filter is truly clean, allowing for optimal airflow, faster drying times, and reduced energy consumption. It’s a small investment of time that pays off in a big way for your home in places like the Pearl District or Irvington.
Expanding Your Clean: The Lint Trap Compartment and Dryer Vent System
While cleaning the lint filter on a dryer is paramount, it’s only the first step. The filter only catches about 25% of lint; the rest accumulates in the lint trap housing and the dryer vent system, where it can cause issues. This hidden lint poses the same fire and efficiency risks as a clogged filter, but on a larger scale. A clogged vent blocks airflow, causing the dryer to overheat, use more energy, and potentially catch fire.
Tools and Supplies for a Deeper Clean
To tackle the lint trap compartment and parts of the dryer vent system, you’ll need a few tools:
- Vacuum with Crevice/Hose Attachment: Your household vacuum is essential for reaching into tight spaces.
- Dryer Vent Cleaning Kit (Brush): These kits include a flexible rod and brush to steer your vent duct.
- Screwdriver: You might need this to detach clamps.
- Gloves and Dust Mask: Protect your hands and lungs from dust and debris.
- Flashlight: Essential for inspecting dark compartments and ducts.
Cleaning the Lint Trap Housing and Vent
Here’s how to give your lint trap compartment and vent system a more thorough cleaning:
- Unplug the Dryer (and Turn Off Gas, if Applicable): Safety first! Unplug your electric dryer. For a gas dryer, turn off the gas supply valve.
- Remove the Lint Filter and Vacuum the Compartment: With the filter removed, use your vacuum’s crevice tool to clean out the lint trap housing, reaching down as far as you can.
- Use a Long-Handled Brush: For stubborn lint, use a long-handled brush to loosen it inside the compartment, then vacuum it up.
- Access and Clean the Dryer Vent Hose:
- Gently pull the dryer away from the wall.
- Loosen the clamps and disconnect the flexible vent hose from the dryer and the wall.
- Inspect the hose and use a dryer vent cleaning brush to push through and dislodge lint, then vacuum out the debris. You might be shocked at how much comes out!
- Clean the Wall Duct: Use your vacuum and brush to reach into the wall duct as far as possible, removing any lint.
- Check the Exterior Vent: Outside, locate your exterior vent cover. Clear away any lint, debris, or nests and ensure the flap opens and closes freely. Consider installing a vent guard to prevent critters from entering.
- Reassemble and Test: Reconnect the vent hose securely. Plug your dryer back in (and turn the gas back on). Push the dryer back into place and run a short, empty air-dry cycle to blow out residual dust and confirm airflow.
For a complete system clean, especially if your dryer vent run is long or has many bends, consider a professional Dryer Vent Cleaning service. Our team at TrueAir PDX provides comprehensive dryer vent cleaning in Portland, Gresham, Beaverton, Tigard, Milwaukie, and throughout the metro area. We have the specialized tools and expertise to ensure your entire system is clear and safe, reducing fire risks and improving your dryer’s efficiency.
Frequently Asked Questions about Dryer Lint Cleaning
Even with a diligent cleaning routine, questions can pop up. Here are answers to common concerns. For more, check our company FAQ.
Why are my clothes still taking forever to dry after cleaning the filter?
This common problem almost always indicates a deeper clog in your dryer’s ventilation system. The filter only captures about 25% of the lint; the rest can accumulate in the vent hose or the ductwork inside your walls. This buildup severely restricts airflow, forcing your dryer to run longer and hotter. This leads to:
- Increased Drying Times: Cycles take much longer than they used to.
- Overheating: The dryer and laundry room feel excessively hot.
- High Energy Bills: The dryer consumes more electricity or gas.
- Appliance Strain: The motor and heating elements are stressed, shortening the dryer’s lifespan.
- Fire Hazard: Trapped heat and lint create an extreme fire risk.
If you’ve deep-cleaned your filter and clothes still dry slowly, it’s a strong signal that you need a full dryer vent system cleaning. This often requires professional tools to clear the entire duct run. Our team at TrueAir PDX is equipped to handle these deeper clogs, ensuring proper airflow and safety.
Can I use a fabric softener sheet to clean the lint screen?
Absolutely not. This common misconception makes the problem worse by transferring a waxy residue directly onto the mesh. This film clogs the filter’s pores, impeding airflow and leading to longer drying times, higher energy use, and increased fire risk. Instead, stick to the recommended deep cleaning method: hot water, mild detergent, and a soft nylon brush to effectively remove the film.
What’s that burning smell coming from my dryer?
If you detect a burning smell, stop the appliance immediately. This is a major warning sign that lint has come into contact with the dryer’s heating element and is beginning to scorch—a precursor to a fire.
Here’s what you should do:
- Stop the Dryer: Turn the dryer off, unplug it, and shut off the gas supply for gas models.
- Do NOT Use Again: Do not use the dryer until the source of the smell is identified and resolved.
- Inspect Thoroughly:
- Check the lint filter and trap compartment for scorching or excessive lint.
- Inspect the entire vent hose and exterior vent for clogs or damage.
- Check the drum for forgotten items (like a crayon) that could have melted.
- Professional Help: If you can’t find the source or see significant lint buildup, call a professional. Our TrueAir PDX team can thoroughly inspect and clean your entire dryer vent system, ensuring it’s safe to operate again. This is a critical safety measure for homes in places like Southeast Portland and Laurelhurst.
Never take a burning smell from your dryer lightly. Your quick action can prevent a serious house fire.
A Clean Filter is Just the Beginning
We’ve covered a lot of ground today, from the simple act of cleaning the lint filter on a dryer after every load to the crucial steps of deep cleaning the screen and tackling the entire dryer vent system. The message is clear: proper dryer maintenance isn’t just a chore; it’s a fundamental aspect of home safety, energy efficiency, and appliance longevity for every household in Portland and beyond.
A clean lint filter is your first line of defense against lint buildup, preventing increased energy bills, frustratingly long drying times, and premature wear on your beloved appliance. More importantly, it’s a powerful tool in preventing devastating dryer fires, a risk that far too many homeowners overlook.
Making routine lint filter cleaning a simple habit is one of the easiest ways to safeguard your home. But as we’ve learned, the lint filter is just the beginning. The unseen lint lurking in your dryer’s internal compartments and throughout its ventilation ductwork poses an equally significant, if not greater, threat.
For total peace of mind, knowing that your entire dryer system is clear, safe, and operating at peak efficiency, we encourage you to go beyond the basics. Our local, trusted, and eco-friendly team at TrueAir PDX specializes in comprehensive dryer vent cleaning services. We use specialized tools to remove all lint and debris from your entire vent system, reducing fire risk, improving air quality, and ensuring your dryer runs as it should.
Don’t let hidden lint become a hidden danger. Schedule your professional dryer vent cleaning today and breathe easier knowing your home is safer and your dryer is more efficient.