Why HVAC Coil Cleaning Is Essential for Your Portland Home
HVAC coil cleaning is one of the most important maintenance tasks you can perform to keep your air conditioning system running efficiently and your indoor air healthy. If you’re experiencing reduced cooling, higher energy bills, or poor air quality in your Portland home, dirty coils are likely the culprit.
Quick Answer: What You Need to Know About HVAC Coil Cleaning
- What it is: Removing dirt, dust, and debris from your system’s evaporator and condenser coils
- Why it matters: Dirty coils can reduce efficiency by up to 30% and increase energy costs
- When to do it: At least once a year, ideally before cooling season
- Time required: Basic DIY cleaning takes under an hour for condenser coils
- Key benefits: Lower utility bills, better cooling, improved air quality, longer system life
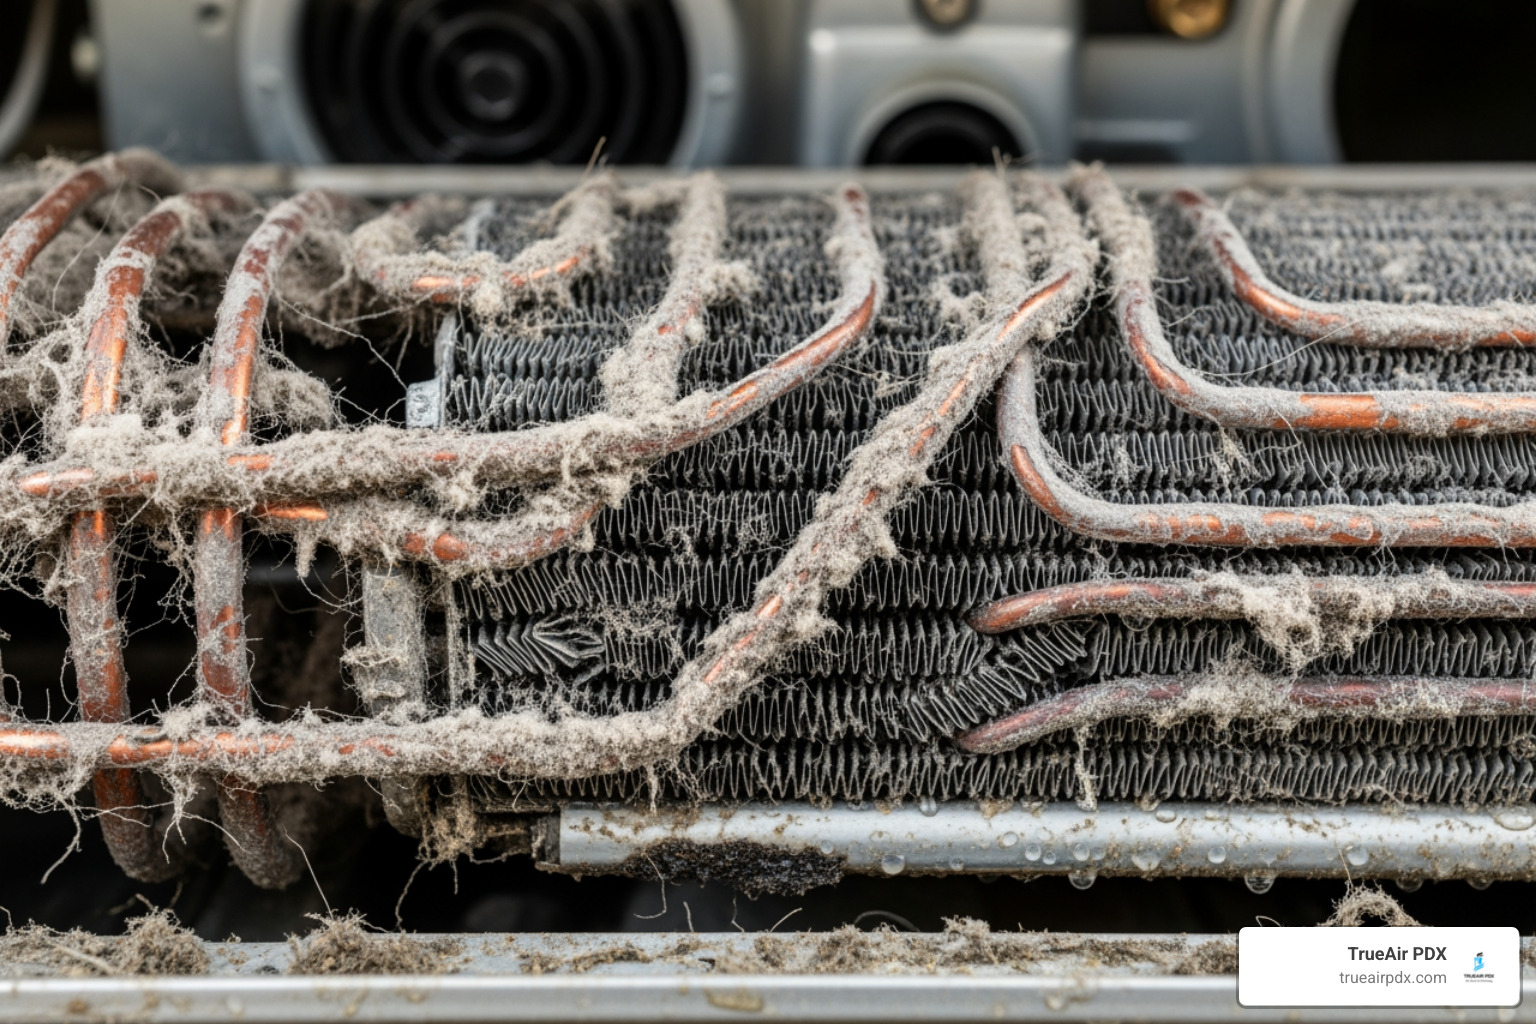
Your HVAC system works hard to keep your family comfortable, especially during Portland’s hot summers. The coils are the heart of this process—they transfer heat to cool your home. But over time, dust, pollen, pet dander, and outdoor debris coat these coils, acting like a thermal blanket that prevents proper heat transfer.
The consequences of neglecting this simple maintenance task add up quickly. Studies show that dirty coils can increase energy consumption by up to 37% while reducing your system’s cooling capacity by 30%. That means you’re paying more for less comfort.
The good news? Basic coil cleaning is a straightforward DIY project that most homeowners can complete in less than an hour. With the right tools, safety precautions, and techniques, you can restore your system’s efficiency and extend its lifespan.
This guide walks you through everything you need to know—from understanding how your coils work to performing a safe, effective cleaning that delivers real results.

The Heart of Your HVAC: Understanding Evaporator and Condenser Coils
At the core of your HVAC system’s ability to heat and cool your Portland home are two unsung heroes: the evaporator coils and the condenser coils. These components are responsible for the crucial heat exchange process that keeps your indoor environment comfortable. Think of them as the lungs of your HVAC system, constantly working to breathe in and out heat.
The heat exchange process is quite clever. In cooling mode, your system absorbs heat from inside your home and releases it outside. The opposite happens in heating mode (if you have a heat pump), where heat is absorbed from the outside air and transferred indoors.
Evaporator Coils: These are typically located inside your home, often within the indoor air handler or furnace. Their job is to absorb heat and moisture from the air circulating through your home. As warm indoor air passes over the cold evaporator coil, the refrigerant inside absorbs the heat, and moisture condenses on the coil’s surface, effectively dehumidifying your air. This cooled, drier air is then sent back into your living spaces.
Condenser Coils: These coils are found in the outdoor unit of your air conditioning system. After the refrigerant absorbs heat from your home, it travels to the condenser coils where it releases that heat into the outside air. The refrigerant then cools down, ready to cycle back inside and absorb more heat.
So, how do these vital components get dirty? It’s a combination of factors:
- Dust and Debris: Everyday household dust, pet dander, and fibers from carpets and upholstery are constantly circulating in your indoor air. Despite air filters, some of this particulate matter inevitably reaches the evaporator coils.
- Pollen and Outdoor Elements: For condenser coils, outdoor exposure means they’re constantly bombarded with pollen, leaves, grass clippings, cottonwood seeds, dirt, and other environmental debris.
- Moisture: Evaporator coils are naturally damp due to condensation. This moist environment, combined with accumulated dust, creates a perfect breeding ground for mold, mildew, and bacteria.
- Airflow: The tight spacing between coil fins, surface moisture, and constant airflow all contribute to the trapping and buildup of these contaminants.
This is why the role of your air filters cannot be overstated. They are the first line of defense against dirt reaching your delicate coils. Regularly changing AC filters is crucial for preventing excessive dirt from depositing on your evaporator coils and causing severe damage. We can’t stress enough how important it is to keep up with this simple task!
Red Flags: Signs Your Coils Need Cleaning & The Cost of Neglect
Ignoring dirty coils is like trying to run a marathon with a weighted blanket—your system works harder, performs worse, and wears out faster. Recognizing the signs that your coils need cleaning can save you significant headaches and expenses down the line.
Here are the red flags to watch for in your Portland home:
- Reduced Cooling Capacity: Is your AC struggling to cool your home, even on a mild day? Dirty coils hinder heat transfer, meaning your system can’t effectively remove heat from your living spaces. You might notice longer cooling cycles or that your home just doesn’t feel as cool as it used to.
- Higher Energy Bills: This is one of the most common and frustrating indicators. Dirty coils make your system work much harder to achieve the desired temperature. An inefficient system means higher energy bills, as it consumes more power to compensate for the reduced heat exchange. Dirty coils can reduce overall system efficiency by up to 30%, and regular cleaning can improve energy efficiency by 5% to 15%.
- Ice Buildup on Coils: This is a clear and concerning sign. Dirty evaporator coils restrict airflow, causing the refrigerant to become too cold and potentially freeze the moisture on the coil surface. Ice formation on coils hinders airflow and efficiency, and can even lead to liquid refrigerant entering the compressor, which can be fatal for the unit.
- Unusual Noises: A system struggling due to dirty coils might produce unusual sounds as components strain. While not always directly from the coils, increased strain on the compressor or fan motor can manifest as new or louder noises.
- Visible Dirt and Grime: For outdoor condenser coils, you can often visually inspect them for a buildup of leaves, grass, dirt, and other debris. For evaporator coils, you might see dust or even mold if you can safely access them.
- Unpleasant Odors: Dirty evaporator coils, especially with moisture present, are prime spots for mold and mildew growth. If you notice a musty or stale smell coming from your vents, microbial growth on your coils could be the culprit.
- System Damage: Compressor Strain: Dirty coils make the system work harder, especially the compressor. Dirty coils can cause the compressor to operate at a high temperature, stressing the entire system. This increased strain can shorten its lifespan and lead to expensive repairs. The mantra in the industry is often, “Compressors don’t die—they are killed.” This “killing” is often due to the added stress from dirty coils.
- Poor Indoor Air Quality: As mentioned, dirty evaporator coils can harbor mold, fungi, and bacteria. These contaminants can then be circulated throughout your home, contributing to allergies, respiratory issues, and generally poor indoor air quality. Regular coil cleaning improves system efficiency and building IAQ.
Neglecting HVAC coil cleaning is a costly oversight. Dirty coils make the system work harder, potentially shortening its lifespan and leading to expensive repairs. Cleaning AC coils is an essential part of preventative maintenance for HVAC systems and can significantly help lower utility bills.
Your Guide to DIY HVAC Coil Cleaning in Under an Hour
Ready to roll up your sleeves and give your HVAC system some love? Cleaning your outdoor condenser coils is a manageable DIY task that can be completed in less than an hour, significantly boosting your system’s efficiency. Indoor evaporator coils require a gentler touch and sometimes professional help, but we’ll cover a basic approach.

Safety First: Turn Off Power at Thermostat and Breaker
Before you touch anything, prioritize safety! Always turn off the power to your AC unit at both the thermostat and the circuit breaker. This prevents the unit from accidentally turning on while you’re working, which could lead to injury.
Tools Needed:
Here’s what you’ll typically need for a basic HVAC coil cleaning:
- Soft Brush: A stiff-bristled brush or a dedicated coil cleaning brush is perfect for gently removing surface debris without damaging the delicate fins.
- Fin Comb: Coils have hundreds of thin aluminum fins that can easily bend. A fin comb helps straighten these bent fins, improving airflow.
- Coil Cleaner: We’ll discuss types below, but choose one specifically designed for HVAC coils.
- Spray Bottle or Pump Sprayer: For applying the cleaner.
- Garden Hose with Spray Nozzle: For rinsing (avoid high-pressure settings like a pressure washer).
- Gloves and Safety Goggles: Essential personal protective equipment (PPE) to protect your hands and eyes from dirt and cleaning chemicals.
- Screwdriver or Nut Driver: To remove the outer casing of your outdoor unit.
- Wet/Dry Vacuum: Useful for larger debris or for indoor coil cleaning.
Choosing a Cleaner
Selecting the right coil cleaner is important. You’ll generally find two types: foaming and non-foaming.
| Feature | Foaming Coil Cleaners | Non-Foaming Coil Cleaners |
|---|---|---|
| Action | Expands into a foam, lifting dirt and grime out of the coil. Often self-rinsing or requires light rinsing. | Liquid solution that penetrates dirt. Often requires more direct scrubbing or rinsing. |
| Pros | Excellent for stubborn dirt; extended dwell time; better penetration into tight spaces; often easier application. | Gentler on coils; easier to rinse completely; good for light to moderate dirt; less residue if rinsed properly. |
| Cons | Can be harsh if not properly diluted or rinsed; may leave residue if not fully flushed; not recommended for microchannel coils. | May require more physical effort (brushing); less effective on heavily impacted dirt; less “wow” factor during application. |
| Best For | Heavily soiled outdoor condenser coils. | Lightly soiled outdoor coils; indoor evaporator coils (ensure it’s labeled safe for indoor use and no-rinse). |
| Our Recommendation | For outdoor condenser coils, a good foaming cleaner can work wonders. | For indoor evaporator coils, a no-rinse, non-foaming option is often preferred. |
Always read the manufacturer’s instructions carefully for dilution, application, and safety precautions.
Step-by-Step: Cleaning Outdoor Condenser Coils
Your outdoor condenser unit works hard, and it shows! Here’s how to get it sparkling:
- Turn Off Power: We’re repeating this because it’s that important! Switch off your thermostat and the circuit breaker dedicated to your outdoor unit.
- Remove Outer Cover: Use your screwdriver or nut driver to carefully remove the outer grille or casing of the condenser unit. Set screws and panels aside in a safe place.
- Clear Large Debris by Hand: Gently remove any large leaves, grass clippings, or other visible debris from the coils and the bottom of the unit. A wet/dry vacuum can also be useful here.
- Straighten Bent Fins with a Fin Comb: Inspect the coil fins. If you see any bent or flattened fins, gently use your fin comb to straighten them. This improves airflow and efficiency.
- Apply Coil Cleaner: Following the product instructions, generously spray the coil cleaner onto the coils. For foaming cleaners, apply from top to bottom and let the foam do its work. Ensure even coverage.
- Let Cleaner Sit: Allow the cleaner to dwell for the recommended time (usually 5-10 minutes). Do not let it dry on the coils.
- Rinse Thoroughly from the Inside Out: Using your garden hose with a spray nozzle (set to a gentle-to-medium spray, never a pressure washer!), rinse the coils thoroughly. For best results, spray from the inside of the unit outwards. This pushes dirt and cleaner out of the coil rather than deeper in. Ensure all cleaner and debris are washed away.
- Reassemble Unit: Once the coils are clean and most of the water has drained, carefully reattach the outer cover and secure it.
- Restore Power and Test: Turn the circuit breaker back on, then your thermostat. Test your AC to ensure it’s cooling effectively. Enjoy that fresh, clean air!
A Basic Approach to Indoor HVAC Coil Cleaning
Cleaning your indoor evaporator coils is a bit more delicate and often requires more access. While a full deep clean is best left to professionals, here’s a basic approach for light cleaning:
- Turn Off Power: Again, safety first! Turn off your thermostat and the circuit breaker for your indoor air handler or furnace.
- Accessing the Evaporator Coil: This can be the trickiest part. The evaporator coil is typically located within the air handler, often behind an access panel. Consult your owner’s manual for specific instructions on how to safely open the unit and expose the coil. You might need a screwdriver.
- Dry Cleaning with a Soft Brush: Once you have access, gently use a soft brush or a special coil brush to remove loose dust and debris from the coil fins. Be extremely careful not to bend or damage the delicate fins. A wet/dry vacuum with a brush attachment can also be used.
- Using a No-Rinse Evaporator Spray: For a more thorough clean, use a no-rinse evaporator coil cleaner. These are designed to dissolve dirt and drain away with the condensate. Follow the product instructions carefully, spraying evenly over the coil.
- Checking the Condensate Drain Pan: Below your evaporator coil is a drain pan that collects the condensate. Check this pan for standing water, slime, or blockages. Clear any debris. You can pour a cup of distilled vinegar down the condensate drain line to help prevent algae growth.
- Reassemble and Restore Power: Once the coil is clean and any no-rinse cleaner has had time to work, carefully close up the air handler, restore power, and test your system.
Importance of Professional Cleaning for Deep Cleans: While these DIY steps can help with light dirt, evaporator coils can become deeply embedded with grime and even mold. Their location often makes them difficult to access and clean thoroughly without specialized tools and expertise. For a truly deep and safe clean of your indoor coils, we recommend professional service. More info about our comprehensive services is available on our website.
Maintaining Clean Coils: Pro Tips, Frequency, and When to Call for Help
Keeping your HVAC coils clean is an ongoing commitment, not a one-time fix. Regular maintenance ensures your system runs efficiently, saves you money, and prolongs its life.

Cleaning Frequency:
- Annually for Most Homes: For the average Portland home, we recommend cleaning your outdoor condenser coils at least once a year. The ideal time is before the cooling season begins (late spring/early summer) so your system is ready for peak performance.
- High-Pollen or Dusty Areas: Twice a Year: If your home is in an area with a lot of trees, construction, or high pollen counts, or if you have pets that shed heavily, consider cleaning your outdoor coils twice a year.
- Indoor Evaporator Coils: These benefit from annual inspection and light cleaning. However, due to their delicate nature and location, a thorough deep clean every few years by a professional is often recommended.
The Role of Air Filters: First Line of Defense
We can’t emphasize this enough: your air filter is your coils’ best friend! A clean, high-quality air filter prevents dust, pet dander, and other airborne particles from reaching and accumulating on your evaporator coils.
- Check Monthly: Visually inspect your air filter every month.
- Replace Regularly: Replace standard 1-inch filters every 1-3 months, and thicker, higher-efficiency filters every 3-6 months, depending on usage and household conditions (e.g., pets, allergies, construction).
- Consider Upgrades: Higher-efficiency pleated filters (with MERV ratings of 8-11) are much more effective at capturing smaller particles that would otherwise end up on your coils.
Beyond just your coils, keeping your entire air system clean is vital. For a whole-system approach that tackles dust, allergens, and contaminants throughout your home’s ventilation, consider Air Duct Cleaning Portland.
DIY vs. Professional HVAC Coil Cleaning
The question often arises: should I clean my coils myself, or call a professional?
DIY Pros:
- Cost-Effective for Light Cleaning: For a moderately dirty outdoor condenser coil, DIY cleaning is a great way to save money and keep your system running smoothly.
- Empowerment: It gives you a sense of control over your home maintenance.
DIY Cons:
- Risk of Damage: Delicate coil fins can easily be bent, impacting airflow. Using the wrong cleaner or too much pressure can cause corrosion or leaks. Microchannel coils, in particular, are very susceptible to damage.
- Less Thorough: It’s often difficult to reach all parts of the coils, especially on the indoor evaporator unit, leaving some dirt behind.
- Lack of Expertise: You might miss underlying issues that a professional would spot, such as refrigerant leaks or electrical problems.
When to Call a Pro:
We strongly recommend calling a professional for:
- Deep Cleaning: If your coils are heavily caked with grime, mold, or have significant ice buildup, a professional has the specialized tools and chemicals for a thorough, safe clean.
- Indoor Evaporator Coils: Due to their location and connection to refrigerant lines, these are best handled by experts to prevent damage or leaks.
- Refrigerant Issues: If you suspect a refrigerant leak or low refrigerant levels (which can cause ice buildup), this requires certified technicians.
- Electrical Problems: Any unusual electrical activity or component failures should only be addressed by a qualified HVAC technician.
- Annual Inspection: Even if you DIY basic cleaning, an annual professional inspection is invaluable for checking overall system health, refrigerant levels, and identifying potential problems before they become costly repairs.
According to the ACR, The NADCA Standard, the coil cleaning process can often be broken down into four steps: Assessment, Visual inspection, Dry cleaning, and Wet cleaning. Professionals follow these rigorous standards to ensure a comprehensive and effective cleaning without causing damage.
The Cost of Professional Services
The cost of professional HVAC coil cleaning can vary, but it’s an investment in your system’s longevity and efficiency.
- Average Cost Range: While specific prices can fluctuate based on location and the extent of the job, a basic professional cleaning of an outdoor condenser coil might be less, while a comprehensive cleaning of both indoor and outdoor coils, especially if the indoor unit is difficult to access, will be more significant.
- Factors Affecting Price:
- Accessibility: Easily accessible outdoor units are less expensive to clean than deeply embedded indoor coils that require partial disassembly of the air handler.
- Level of Dirt: Severely neglected coils requiring extensive scrubbing or specialized chemicals will cost more.
- System Type: Larger or more complex HVAC systems (e.g., commercial units vs. residential split systems) can influence the price.
- Additional Services: If the technician identifies other issues like refrigerant leaks or clogged drain lines, these will add to the total cost.
What’s Included in a Service: A professional cleaning typically includes a thorough inspection of both coils, removal of debris, application of specialized cleaners, thorough rinsing, and often a check of the condensate drain pan. Many services also include a general system check-up to ensure everything is running optimally.
Frequently Asked Questions about HVAC Coil Cleaning
How often should HVAC coils be cleaned?
For most residential units in Portland, we recommend that your HVAC coils be cleaned at least once a year. The ideal time is before the main cooling season begins in late spring or early summer, to prepare your system for heavy use. However, if your home is in a particularly dusty area, near construction, surrounded by many trees (hello, cottonwood!), or if you have pets that shed a lot, cleaning them twice a year might be necessary to maintain optimal efficiency.
What happens if my AC coils are dirty?
If your AC coils are dirty, they act as an insulator, significantly impeding the heat transfer process. This forces your HVAC system to work much harder and longer to cool or heat your home, leading to reduced efficiency by up to 30% and noticeably higher energy bills. Additionally, dirty coils can cause reduced airflow, poor cooling performance, and even ice formation on the evaporator coil. This ice can then lead to liquid refrigerant entering your compressor, which is a common cause of premature compressor failure and expensive repairs.
Can I use household cleaners on my HVAC coils?
We strongly advise against using general household cleaners on your HVAC coils. Many household cleaners can be too harsh, acidic, or corrosive, potentially damaging the delicate aluminum fins and copper tubing of your coils. This can lead to corrosion, leaks, or even complete coil failure. Always use a dedicated coil cleaner specifically designed for HVAC systems. These cleaners are formulated to be safe for coil materials while effectively breaking down dirt and grime. For a very light cleaning, a simple solution of mild detergent (like dish soap) and water can be used, but always ensure thorough rinsing.
Conclusion
We hope this guide has demystified HVAC coil cleaning and empowered you to take proactive steps toward maintaining your system. Regular coil cleaning offers a trifecta of benefits for your Portland home: improved energy efficiency, significant cost savings on utility bills, and improved indoor air quality for a healthier living environment.
While basic DIY cleaning of your outdoor condenser coils can be a rewarding task, some aspects, particularly the delicate indoor evaporator coils, often benefit from professional expertise. For a truly deep and professional clean that ensures your system’s health and longevity, especially for those hard-to-reach areas or if you suspect more serious issues, trust the experts at TrueAir PDX.
We’re here to help keep your air fresh and your system running smoothly. Get a Free Quote for your Furnace & HVAC Coil Cleaning today and breathe easier in your home!