
Why a Properly Venting Dryer Matters for Your Home
A dryer not venting properly is more than just an inconvenience it’s a serious safety hazard that affects your home’s air quality, your family’s health, and your wallet. When your dryer can’t exhaust hot, moist air and lint to the outside, the consequences can be dangerous and costly.
Quick Answer: Key Signs Your Dryer Isn’t Venting Properly
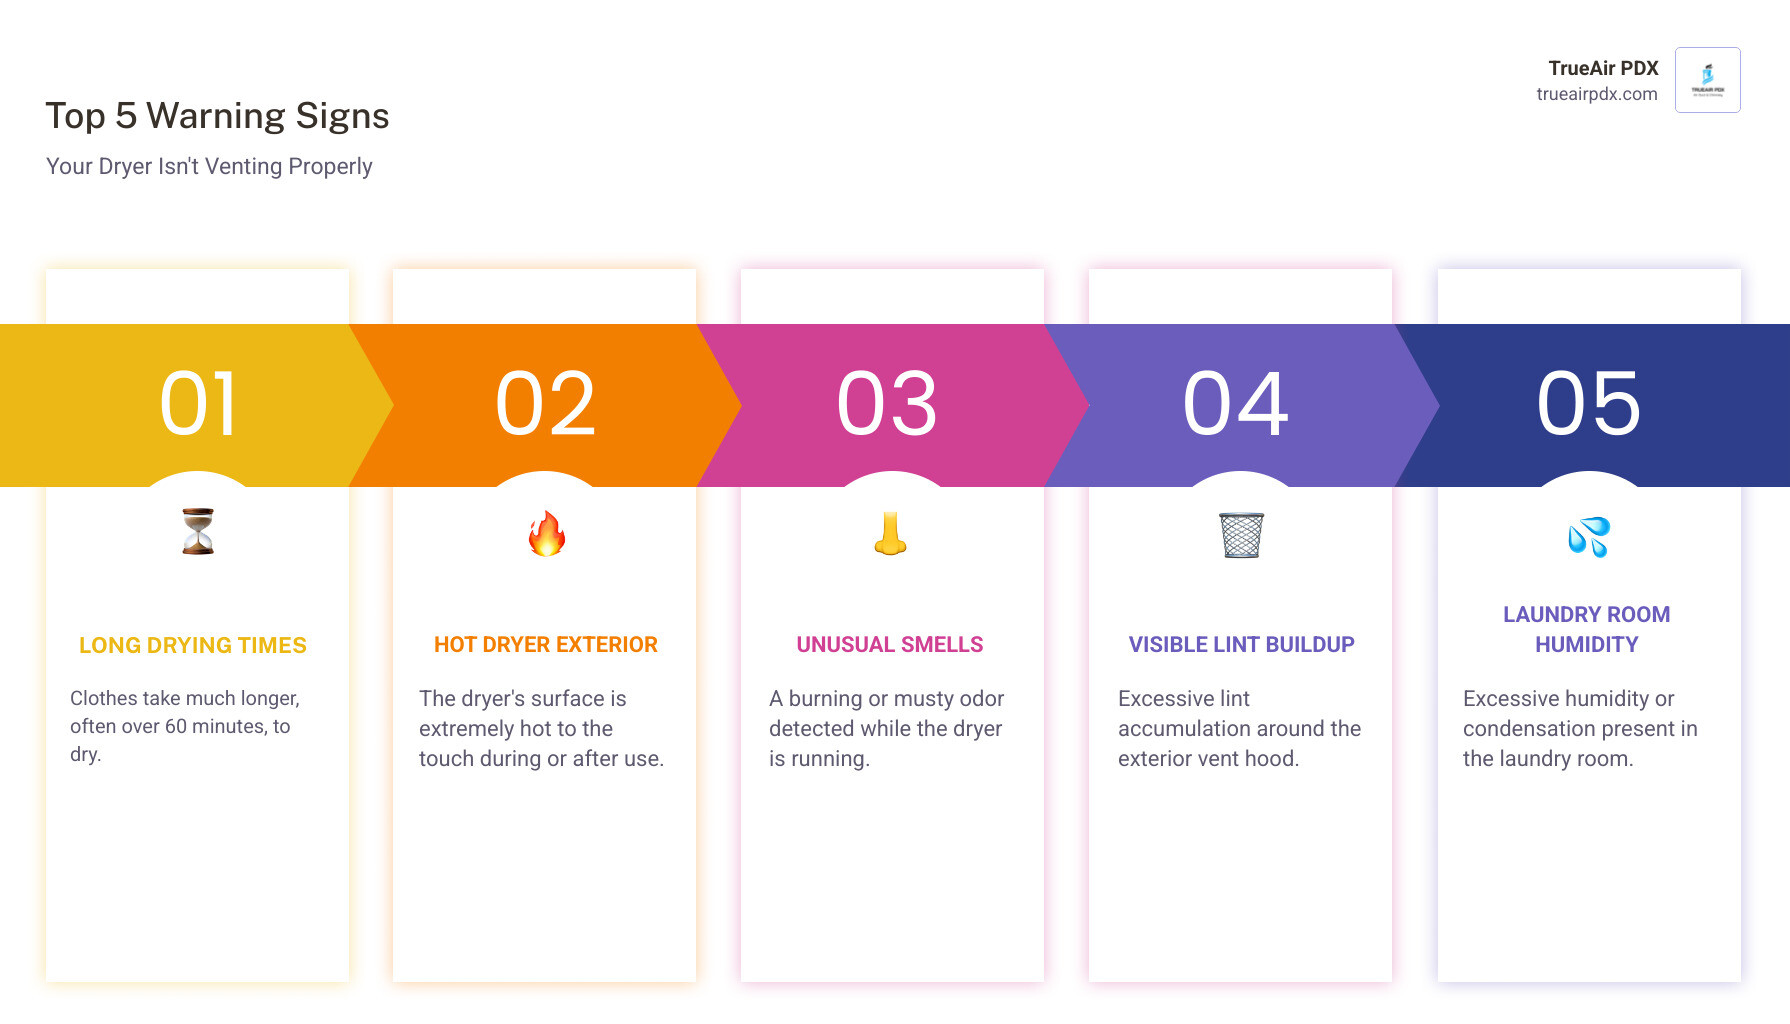
- Clothes take much longer to dry than normal (more than one cycle)
- Dryer feels extremely hot to the touch during or after use
- Burning smell when the dryer is running
- Visible lint accumulation around the exterior vent hood
- Excess humidity or condensation in your laundry room
- Musty odors on clothes after drying
The reality is stark: according to the U.S. Fire Administration, clothes dryers cause approximately 2,900 house fires each year, with the leading cause being a failure to clean them. Beyond fire risk, a dryer that can’t vent properly forces moisture back into your home, creating the perfect environment for mold and mildew especially concerning in the Pacific Northwest climate.
Your dryer is trying to tell you something. When it’s working harder and taking longer to dry your clothes, it’s like “running a marathon with a backpack full of rocks,” as one home maintenance expert put it. The appliance strains, components overheat, and your energy bills climb.
The good news? Most venting problems can be diagnosed and fixed with some basic knowledge and tools. This guide will walk you through how to identify, fix, and prevent dryer venting issues to keep your Portland home safe, healthy, and efficient.
The Serious Risks of a Dryer Not Venting Properly
When your dryer not venting properly, it’s not just an efficiency issue; it introduces a range of serious risks to your home and health. As a trusted local business serving Portland, Gresham, Beaverton, and surrounding areas, we’ve seen the dangers that arise from neglected dryer vents.
One of the most critical reasons for proper dryer venting is to prevent house fires. Lint, a highly flammable material, builds up in the ducts and can obstruct the vent, preventing airflow. This restriction causes heat to build up, which can cause the trapped lint to combust and lead to a fire that spreads to your home. In fact, failure to clean the dryer is the leading cause of clothes dryer fires, which result in numerous injuries and significant property loss annually. This statistic underscores why regular maintenance is so vital for Portland homeowners.
Beyond fire, there are other significant concerns:
- Carbon Monoxide Poisoning (for Gas Dryers): If you have a gas dryer and the vent becomes blocked, harmful combustion gases, including carbon monoxide, can back up into your home. Carbon monoxide is odorless and colorless, making it a silent killer. Proper venting ensures these dangerous gases are safely expelled outside.
- Mold and Mildew Growth: Our humid Pacific Northwest climate already makes homes susceptible to mold. If your dryer vent is not properly vented to the outside, moisture from drying clothes can accumulate inside the vent system and even leak into your home’s structure. This creates an ideal environment for mold and mildew to grow, leading to health issues such as respiratory problems and unpleasant odors. We’ve seen homes in Milwaukie and Tigard develop mold issues from this very problem.
- Reduced Dryer Efficiency: A clogged or disconnected vent forces your dryer to work harder and longer to dry clothes. This is like forcing your appliance to run a marathon with a heavy backpack—it strains, overheats, and takes much longer to complete its task.
- Appliance Damage: The constant overheating and straining caused by a dryer not venting properly can lead to premature wear and tear on your appliance’s components, including the heating element, motor, and thermostat. This can result in costly repairs or even the need to replace your dryer entirely much sooner than expected. Clogged and disconnected dryer ducts can lead to the dryer overheating and straining to the point that it breaks.
- Increased Utility Costs: When your dryer has to run multiple cycles or for extended periods to get clothes dry, it consumes significantly more energy. This translates directly into higher electricity or gas bills, hitting your wallet harder than it should.
- Health Risks: As mentioned, mold and mildew can cause respiratory problems, allergies, and other health issues. Lint itself can also become an indoor air pollutant if it’s not properly exhausted outside.
Signs of a Clogged or Disconnected Vent
Recognizing the symptoms of a dryer not venting properly is the first step toward a solution. Here are the most common warning signs we tell our clients in Beaverton, Gresham, and throughout Portland to look for:
- Clothes Take Longer to Dry: This is often the most obvious indicator. If your clothes require multiple cycles, or significantly longer than usual, to dry completely, it’s a strong sign of restricted airflow.
- Dryer is Hot to the Touch: The top or front of your dryer feeling unusually hot during or after a cycle suggests that heat is trapped inside the appliance and not being expelled outdoors.
- Burning Smell: Lint is highly flammable, and a burning smell during operation can indicate that lint is overheating inside the vent or the dryer itself. This is a serious fire hazard and should prompt immediate investigation.
- Visible Lint Around Vent Hood: If you notice lint clinging to the outdoor exhaust vent, or even accumulating around the dryer’s exterior vent opening, it’s a clear sign that lint is not being properly expelled.
- Excess Humidity in Laundry Room: A disconnected vent or a heavily clogged one can release hot, moist air directly into your laundry room. This can lead to a noticeable increase in humidity, condensation on windows, or a general muggy feeling.
- Mold Signs: If moisture is being released into your home, you might start to see visible mold or mildew growth on walls, ceilings, or even on your clothes after drying. This is particularly prevalent in areas like Southeast Portland and Montavilla where humidity can be a factor.
How Poor Venting Affects Dryer Efficiency and Lifespan
We often find that homeowners underestimate how crucial proper venting is for their dryer’s performance and longevity. When your dryer not venting properly, it suffers in several ways:
- Overheating Components: The primary function of the vent is to expel hot, moist air. When airflow is restricted, this heat gets trapped. The dryer’s internal components, such as the heating element, thermal fuse, and motor, are forced to operate at higher temperatures than designed. This excessive heat stresses these parts, leading to premature failure.
- Strained Motor: To push air through a clogged or kinked vent, the dryer’s blower motor has to work much harder. This constant strain can cause the motor to burn out, requiring expensive repairs or replacement.
- Increased Wear and Tear: The entire appliance is under more stress when it has to compensate for poor venting. This accelerates the wear and tear on all moving parts and electrical components, significantly shortening the dryer’s lifespan.
- Higher Energy Consumption: As we mentioned, longer drying times mean more energy consumed. Your dryer becomes an energy hog, leading to inflated utility bills.
- Premature Appliance Failure: The cumulative effect of overheating, straining, and increased wear and tear can cause your dryer to break down completely, often well before its expected lifespan. This isn’t just an inconvenience; it’s a significant financial burden.
How to Diagnose Venting Problems: A Step-by-Step Inspection
Before we can fix a dryer not venting properly, we need to pinpoint the exact problem. Many issues can be diagnosed with a thorough, step-by-step inspection. We always recommend starting with these checks for our customers in Northwest Portland, the Pearl District, and beyond.

Checking for a Clogged Dryer Vent
A clogged dryer vent is the most common culprit behind poor dryer performance and a major fire hazard. Here’s how we recommend you check for it:
- Safety First: Unplug Your Dryer! Before you touch anything, always disconnect your dryer from its power source. If it’s a gas dryer, you’ll also need to shut off the gas supply and cap the gas line. Safety is paramount!
- Locate and Inspect the Dryer Vent Opening: Pull your dryer away from the wall to access the back. Locate the vent opening on the dryer itself where the transition duct connects. Inspect it for any visible lint buildup.
- Disconnect the Transition Duct: Loosen the clamps or tape securing the flexible transition duct to the back of the dryer and to the wall outlet. Carefully detach the duct from both ends. Be gentle, especially if it’s a plastic or foil duct, as these can tear easily.
- Inspect the Transition Duct for Lint Buildup: Once disconnected, look inside the duct. Is it packed with lint? Is it crushed or kinked? Remove any large clumps of lint by hand. Use a dryer cleaning brush or a vacuum hose with an attachment to clear out as much debris as possible from the entire length of the duct.
- Inspect the Wall Outlet: Look into the vent opening in your wall. This section of the duct can also accumulate lint. Use your brush and vacuum to clean as far as you can reach.
- Inspect the Exterior Vent Hood for Blockages: Go outside and locate the dryer vent hood on the exterior of your home. Check for any visible obstructions. This could be anything from lint buildup, to leaves, to animal nests (birds and rodents love to make homes in these cozy spots!). We’ve seen some impressive bird nests in vents across the Alberta Arts District! Make sure the flapper (if present) opens and closes freely.
How to Tell if Your Dryer Vent Hose is Damaged or Disconnected
Sometimes, the issue isn’t just a clog, but physical damage or a faulty connection. This can be particularly sneaky. Here’s what to look for:
- Pull Dryer Away from Wall: Give yourself plenty of room to work. Pull the dryer far enough from the wall so you can easily see and access the entire transition duct.
- Inspect Transition Hose for Kinks, Crushed Sections, Tears or Holes: Carefully examine the entire length of the flexible transition duct.
- Kinks and Crushed Sections: These are common if the dryer is pushed too close to the wall or if the duct is too long. They severely restrict airflow.
- Tears or Holes: Look for any rips, punctures, or separations in the duct material. These allow moist, hot air and lint to escape into your home, causing humidity problems and fire risks. If your duct is made of plastic or aluminum foil, it’s more prone to these issues.
- Check Connections at Dryer and Wall: Ensure the transition duct is securely fastened at both the dryer’s exhaust port and the wall outlet. Loose connections are a major cause of moisture and lint leaking into your home. We recommend using metal clamps to secure these connections, not tape.
- Inspect the Duct Material: While we’ll discuss this more later, quickly assess your duct material. If it’s plastic or thin foil, it’s more likely to be damaged or collapse than rigid or semi-rigid metal ducts. If you have these materials, they should be replaced with safer, more durable options.
How to Clean a Clogged Dryer Duct
Once you’ve identified that a clogged or damaged duct is causing your dryer not venting properly, it’s time to get cleaning! This process is manageable for many homeowners, and we’ll guide you through it.
Safety First: Essential Preparations
Before you begin, always prioritize safety:
- Unplug Dryer: Disconnect the dryer from its electrical outlet.
- Shut Off Gas Line (if applicable): If you have a gas dryer, turn off the gas supply valve and, if possible, cap the gas line.
- Gather Tools: You’ll need a screwdriver (for clamps), a powerful vacuum cleaner (shop vacs work great), a dryer vent cleaning brush kit (these typically include long, flexible rods and brushes), and possibly some aluminum foil tape for re-sealing.
Step 1: Access and Disconnect the Vent
- Move Dryer Away from Wall: Gently pull your dryer away from the wall, allowing ample space to work behind it. This is where an extra pair of hands can be helpful!
- Loosen Clamp on Transition Duct: Locate the clamp or tape securing the flexible transition duct to the back of your dryer’s exhaust port. Use your screwdriver to loosen the clamp or carefully peel off the tape.
- Detach Duct from Dryer and Wall Outlet: Carefully remove the transition duct from both the dryer and the wall vent opening. Be gentle, as older or plastic ducts can be brittle.
Step 2: Clean the Duct and Vents
Now for the satisfying part—removing all that lint!
- Clean the Transition Duct: Take the disconnected transition duct outside. Use your dryer vent cleaning brush, attaching sections of the rod as needed, to push through and dislodge lint from both ends. Follow up with your vacuum cleaner to suck out the loosened debris.
- Clean Inside the Dryer’s Exhaust Port: Use the brush and vacuum to clean the lint and debris from the exhaust port on the back of the dryer itself.
- Clean Inside the Wall Duct Opening: Insert your dryer vent brush into the wall vent opening. Push the brush as far as it will go, twisting it to dislodge lint. Use your vacuum to remove the loosened lint. If your vent run is particularly long or has many turns, you might need to use additional rod extensions from your cleaning kit. For homes in areas like Laurelhurst or Sellwood with longer, more complex vent runs, this can be quite a task!
- Clear the Exterior Vent Cap: Go outside again and thoroughly clean the exterior vent cap. Remove any lint, debris, or nests that you find. Make sure the flapper mechanism can swing freely.
Step 3: Reassemble and Test
Almost done!
- Reconnect the Duct Securely: Reattach the transition duct to both the dryer’s exhaust port and the wall outlet.
- Use Metal Clamps: Secure the connections with metal clamps (not plastic ties or duct tape, as these can fail and aren’t fire-safe). Ensure a tight seal to prevent air and lint from escaping.
- Push Dryer Back Carefully: Gently push the dryer back into its position, being careful not to kink or crush the transition duct.
- Reconnect Power and Gas: Plug your dryer back in and, if applicable, turn your gas supply back on.
- Run an Empty Cycle: Run an empty load on a heated cycle for about 15-20 minutes. Go outside and confirm that there is now strong, warm airflow coming out of your exterior vent. This confirms your efforts have paid off and your dryer not venting properly issue is resolved!
DIY vs. Professional Cleaning & Preventing Future Issues
Addressing a dryer not venting properly problem often brings up the question: can I do this myself, or should I call in the pros? While some basic cleaning is DIY-friendly, there are important considerations.
| Material | Durability | Airflow | Fire Resistance | Cost | Pros
I